Want fresh, farm-fresh eggs daily and a thriving garden fueled by nature? Building a chicken tractor is surprisingly simple and incredibly rewarding! This comprehensive guide provides step-by-step instructions, crucial design considerations, and expert tips to help you create a mobile haven for your chickens while simultaneously enriching your soil. Whether you're a seasoned DIYer or a complete novice, you'll be amazed at how easily you can build your own chicken tractor and reap the benefits of sustainable living. For extra help sourcing materials, check out this guide on chicken grit.
Make a Chicken Tractor: Your Step-by-Step Guide to Mobile Poultry Paradise
Building a chicken tractor is a fantastic blend of practicality and sustainable agriculture. It's like providing your chickens with a luxurious, mobile five-star hotel! Why spend a fortune on pre-made coops when you can create a custom-designed tractor that perfectly suits your needs and budget? Let's start building this haven for your feathered friends.
Planning Your Chicken Tractor: Size, Materials, and Budget
Before you pick up a hammer, careful planning is essential. The first step is determining the size. A commonly recommended guideline is to allocate 10 square feet of space per chicken. Think of this as their individual apartment within the tractor!
Next, consider the materials. Embrace sustainability by utilizing recycled lumber – old pallets, reclaimed fence posts, and even leftover planks from past projects are perfect choices. This eco-friendly approach not only saves money but also minimizes environmental impact. For the sides, sturdy hardware cloth (a far superior alternative to chicken wire for predator resistance) is crucial. Think of it as impenetrable armor against unwanted visitors!
Budgeting is key. Reusing materials significantly lowers the cost, and you'll be surprised at how much you likely already have on hand.
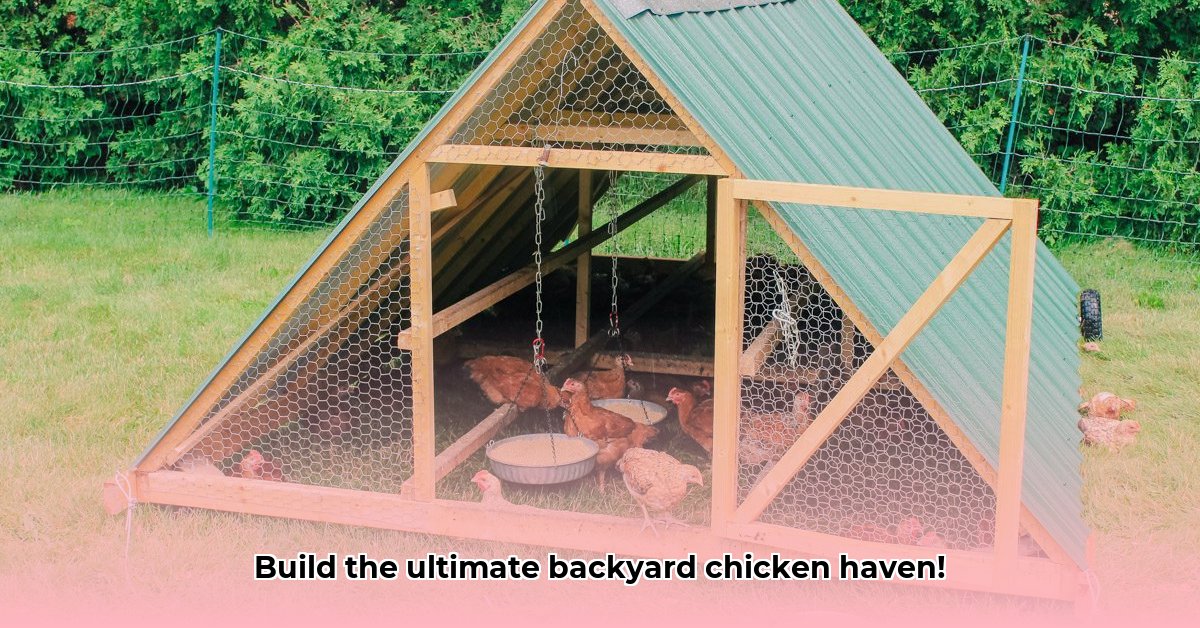
Step-by-Step Construction: Building Your Chicken Tractor
Safety is paramount! Ensure you have the correct tools and are working in a well-lit, safe area. Here’s a breakdown of the construction process:
Step 1: Building the Frame: Cut your lumber to the planned dimensions (remember, 10 square feet per chicken!). This forms the tractor's base. Assemble the frame using screws or nails, ensuring all corners are square and exceptionally sturdy—a wobbly frame is a recipe for disaster.
Step 2: Crafting the Floor: A solid floor is vital to contain your chickens and prevent digging. Plywood or more recycled lumber works well. Securely attach it to the frame.
Step 3: Securing the Walls: This is where your hardware cloth shines. Attach it firmly to the frame, leaving no gaps or weak spots. Remember, our goal is to keep chickens securely inside and predators firmly outside.
Step 4: Constructing a Protective Roof: A simple roof protects your flock from the elements. Plywood or corrugated metal are durable options. Consider your local climate when selecting roofing materials.
Step 5: Adding a Secure Door: A strong door with secure latches enables easy access while preventing escapes.
Step 6: Wheels and Handles for Easy Maneuverability: Attach sturdy wheels to the bottom of the frame and add handles for easy relocation. This is crucial for rotational grazing, which maximizes soil fertilization.
Step 7: Adding Finishing Touches: Roosting bars provide comfortable resting spots, and a nesting box offers a secluded area for egg-laying (optional but highly recommended!).
Choosing the Perfect Location and Keeping Your Chickens Safe
Placement is crucial! Regular relocation of your chicken tractor across your yard or garden ensures even soil fertilization and natural pest control. It’s nature’s own fertilizer-spreading service!
Predator protection is paramount. Consider burying the bottom of the hardware cloth several inches into the ground to deter digging animals. Think of it as constructing a fortress for your feathered friends! This extra precaution can significantly impact your flock's safety. Is it worth the extra effort considering the potential losses? Absolutely!
Potential Challenges and Easy Solutions
While the process is straightforward, you might encounter some challenges:
Predator Problems: Weasels, raccoons, and foxes are potential threats. Reinforcing the tractor's base and sides with extra hardware cloth or adding a wire mesh skirt around the bottom is a preventative measure. A heavy-duty latch is also wise.
Weather Woes: Add insulation in winter to keep your chickens warm (a simple tarp can help). In summer, adequate ventilation prevents heat stress.
Mobility Issues: Regularly inspect and replace worn-out wheels to ensure smooth maneuverability.
Level Up Your Chicken Tractor: Adding Extra Features
Enhance both chicken comfort and your convenience with these optional additions:
| Feature | Benefits | Considerations |
|---|---|---|
| Removable Floor | Easy cleaning! | Material choice affects durability. |
| Automatic Feeder | Consistent food supply, less work for you! | Requires electricity. |
| Waterer | Constant fresh water access | Minimize spills and waste. |
| Solar-Powered Light | Added security, helps monitor egg-laying | Consider cost and energy efficiency. |
Remember, building a chicken tractor is an iterative process. Don’t strive for perfection on the first attempt. Start with the basics and refine the design as your needs and experience evolve. Before you know it, you'll savor the freshest eggs from your own backyard!
How to Quantify Soil Nutrient Improvement from Using a DIY Chicken Tractor
Building a chicken tractor isn’t solely about happy hens; it's also about enriching your garden soil naturally. But how do you measure this improvement? Let’s explore how to quantify this enhancement.
Designing Your Chicken Tractor for Optimal Soil Enrichment
Your tractor's design directly affects soil improvement—it's a mobile, natural fertilizer factory! Even manure distribution is key to consistent soil enrichment.
- Size Matters: Size should accommodate your flock but allow for easy movement. Overcrowding leads to uneven manure distribution and compaction.
- Mobility is Key: Wheels or skids are essential for relocation, preventing overgrazing and promoting healthier soil.
- Run-In Shed: A sheltered area protects hens from harsh weather and droppings from washing away.
- Easy Cleanup: Design for easy cleaning to prevent buildup and maintain hygiene.
Implementing Rotational Grazing: A Cornerstone of Success
Rotational grazing maximizes the benefits of chicken manure. Imagine your garden divided into sections; your chicken tractor moves from section to section, fertilizing each area followed by a rest period.
- Plan Your Rotation: Divide your garden into several sections. Move the tractor to a fresh area every few days (depending on flock size and soil conditions).
- Observe and Adapt: Monitor plant growth and soil conditions to adjust the schedule.
- Monitor for Nutrient Imbalances: Too much manure can harm plants. Regular monitoring is essential.
How to Quantify Soil Nutrient Improvement
Soil testing is your primary tool for measuring the impact.
- Baseline Test: Conduct a comprehensive soil test before introducing the chicken tractor. This provides a baseline for comparison.
- Regular Testing: Perform tests at regular intervals (e.g., every 3-6 months) and compare results to the baseline.
- Focus on Key Nutrients: Pay attention to nitrogen, phosphorus, and potassium (NPK) levels, as chicken manure is rich in these.
- Professional Analysis: Consider a professional analysis for a more precise assessment.
Understanding the Limitations
Chicken tractors are excellent, yet not a magic bullet.
Pros: Natural soil enrichment, pest control, weed suppression, and reduced need for chemical fertilizers.
Cons: Potential soil compaction (if not managed properly), risk of nutrient imbalances (requires monitoring), and the initial investment of materials and time.
Success rests upon careful planning, observation, and regular monitoring. Remember, it's a journey, not a race!